Wednesday, June 6, 2018

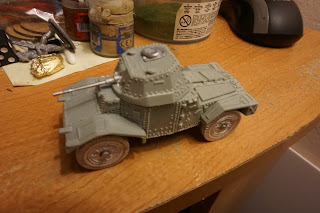
Warlord Panhard 178

I am Ian Gabor, the "new" writer for Trench Monkeys. I put new in quotations as this is my first post  despite having been added to the "staff" months ago. I'm going to start with a review of the Warlord Panhard 178.

Much like Warlord's other resin kits the one I recieved was cleanly cast and didn't require much cleanup. The parts count was also low which I personally like and It also came with a crew figure which is always nice.


 I don't know if I didn't clean the resin well enough or what but the actual assembly of the turret was a pain in the ass and I wound up saying f*ck it and discarding the turret.


I replaced the turret from Warlord with a new turret sculpted by Richard Humble who does commission work and I highly recommend him. This particular turret is for the Panhard 178b which was a post war creation and was used in Indochina and the colonies for patrol duty.


I've painted mine up for service in Indochina as that is my preferred conflict to wargame. 

Saturday, April 14, 2018

Tutorial: Painting a Messerschmitt BF109

Today I will be taking you through how I have painted my Messerschmitt BF109 for Blood Red Skies by Warlord Games. The models don't come painted, and may be a bit daunting for those who haven't painted such small models before. So lets dig in, and get your planes painted and ready to take to the skies.

Step One: Prime in what ever you colour you desire. Black or Grey is probably the best.

Step Two: I did a thin coat of VMC London Grey

Step Three: Apply a heavy black wash

Step Four: I next applied the yellow markings on the nose, wing tips and rudder, common on the BF109. This was done with VMC German C. Orange Ochre. Be sure to be careful around the panel lines


Step Five: The main body of the plane was painted with VMC Blue Grey Pale. Again being careful around the panel lines.

Step Six: I painted the canopy with Reaper True Blue

Step Seven: Apply the stickers that came in the box. Now unfortunately, they are a different colour than we painted the body. So carefully paint around Balkenkreuz with Blue Grey Pale. This won't hold up to close scrutiny but we are more concerned with getting the planes ready for battle.

Step Eight: Using VMC German Grey, paint the canopy lines and the engine intakes.

Wednesday, April 11, 2018

First Impressions: Blood Red Skies


So after several eager months, Blood Red Skies by Warlord Games, finally arrived on my doorstep! To start I love the box art, The blood red skies (see what I did there?) with the planes flying in formation is just so awesome; definitely catches the eye.

Squadron of Spitfires
Squadron of BF109s


Now as I opened the Battle of Britain box, I can not confirm or deny that I squealed and cooed over the planes like a little girl seeing a box of kittens. The planes have very good detail and the two i've painted thus far have turned out beautifully. I also really love the positionable flight stands for displaying planes having advantage and disadvantage.

Now one of the few things that I knew about before the game arrived, was the colourful art on the cards (which are used for the planes, pilots, and skills, kinda like X-Wing). The art feels out of place compared to the box art, but its not really a negative. I believe if the card art was similar to the box art it would be difficult to identify the cards. I don't have a picture for the cards, because I'm waiting to sleeve them.

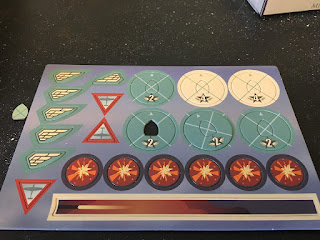
The same is for the chits and the measuring sticks. They are clear and easy to read but don't really fit with the box art.

I love the dice. The 6s are a Spade in the Battle of Britain box, but there are dice sets that have the countries logo on them.

The complete bundle also comes with Pilot minis for the Aces that are also included in The complete bundle. They come with awesome plinth bases. They will need some major cleaning, and I will be sharing my painting process.

All in all I can't wait to get stuck in to this game. I will be back with more about the rules once I get a chance to play it. Also, keep an eye out for some painting tutorials for every faction!

So chocks away, and see you in the Blood Red Skies

Sunday, February 25, 2018

Editorial: War Games Not War

The only way to understand war is to learn about it. Everyone has heard tales of the trauma incurred by soldiers in combat, you can see the news coverage, you can watch a film. But that only scratches the surface. You need to read the stories from the men, learn about the campaigns, watch the videos from the front lines, watch the documentaries.

 To truly understand war, you need to learn about it. Study it. Even if it disgusts you. I play war games, and this is not saying that I make light of warfare. When you play a war game, you are attempting to capture the challenges that an NCO or Officer, faces while commanding his men. It's also a battle of the mind, attempting to outsmart your opponent.

 Yes, at the end of the day I am simply playing with toy soldiers. I am having fun and telling jokes. But it is much more than this. It's reading about the conflict, researching the theatres of war, learning about the equipment and weapons. We are aware of the horrors of war; and despite the fact that we are having fun, we are able to separate the real events and people from our little plastic soldiers. In the back of my mind, I'm always thinking about those who have given their lives for their countries or causes.

 War gaming gives us something more than just dates and locations. It gives us a way to enjoy the history we've learned in a wonderful way. So, if you love history, and a war gamer offers to show you how to play their favourite game, give it a shot. You will see the passion they have for their chosen era. When you see the amount of work put into the models and terrain is mind blowing, and you will be able to understand that this person truly cares about the subject. If you care about someone who is a historical war gamer, and you yourself loves history; Let them show you what parts of history they love. It will mean more to them than you can possibly imagine.


 Play war-games instead of waging war.

Saturday, January 13, 2018

Review: Maelstrom's Edge

I recently recieved the starter box for Maelstrom's Edge by Spiral Arms Studios. Now, I'm not really interested in getting into a new miniatures game, but I can't say no to free models.

So first off, the artwork is amazing. I'm a sucker for awesome game art, and I love the style this game has. I'm not going to go into the rules because, I already have too many rulesets in my head right now. But perhaps I'll come back later and look at them.

The models themselves are very nice. The sculpts are crisp, and there was very little flash and mould lines. They are in the "heroic" style like those by Games Workshop.

 I really like the Epirian Foundation. They kind of look like the Colonial Marines in Aliens, and they could be a nice alternative to the Imperial Guard. They also have some awesome mechs. They really fit my image of Sci-Fi militaries.

The Karist Enclave are from what I can tell are the "Bad Guys". They have very sleek armour and these crazy looking demon models, which will probably be fun to paint (I haven't cut them off the sprues yet).

The box also comes with a pair of sprues for terrain building which is pretty great, You can use the pieces for any sort of Sci Fi Terrain!

One complaint was that the models didn't come with instructions in the box. I had to go to the website to find the kit instructions.
Another complaint is that the chits are just thin cardboard, but seeing as this is a new game/company it could be a lot worse. But again the art looks amazing.

All in all they are decent models, and I expect that the game will be fun to play.

I'd give the game 3.75 out of 5 stars. But that may change when I look at the rules.

Tuesday, January 9, 2018

Review: Charlie Foxtrot Models


Ruined House 1
"Tabac tobacconists shop" and "Dormer House 2"
So about a month ago, I ordered some buildings from Charlie Foxtrot Models. They are MDF kits, which seem to be a standard in the hobby. One thing that sets the Charlie Foxtrot kits are, in my opinion; they are very characterful. I really like the unique look that each building has, especially the shops. Each building seems like it's own building, unlike other manufacturers. Now, I'm not saying I don't like other manufacturers, but Charlie Foxtrot Models are easily my favourite. They assemble with out headaches, and they for sure paint up nicely.

My first complaint with the kits are is that they didn't come in sprues, but where already punched out. Which isn't a massive complaint, but it was a bit surprising. My last complaint, is that getting the squares used for securing upper floors can be a bit fiddly. But that's probably just my poor craftsmanship.

All in all, I have fallen in love with these kits and will definitely be purchasing more in the future! I encourage everyone to check out the kits.

I would love to see Colin make some kits in 1/72 for the Vietnam War, such as village buildings and bunkers.

Charlie Foxtrot Models gets a 4.75 out of 5 Stars!

Monday, September 25, 2017

Into the Bush (Galen's Vietnam Project)- Tutorial: Jungle Scatter Terrain.

So the Vietnam War has been a fascinating subject to me for a long time. Probably due to hearing stories about the press coverage from my parents who grew up during the war. So when I started Wargaming, naturally I wanted to game the conflict. Over the past year or so, I've begun collecting forces and vehicles. But the most daunting part of gaming Vietnam is probably to model the dense jungle that makes up the Vietnamese Highlands. I've conducted numerous experiments and now I feel confident to share one of the methods I came up with.

Materials:

  • Your prefered terrain basing material
  • Plastic Aquarium/Terrarium Plants
  • Clump Foam
  • Flock/turf 


Step One:
So I decided to use balsa wood for my scatter bases, because I'm limiting my spending to save for a trip to Normandy in 2019. Also it's easy to cut without power tools. In fact you can just use a hobby knife to cut it. I shaped it in an oblong shape, trying to remove any super straight edges. I also sanded down the edges to make a bevel.

Step Two:
I spray painted it with Army Painter "Leather Brown" Primer, so if the flock gets rubbed of it looks like there is dirt.


Step Three:
With PVA glue I flocked around the edge 


Step Four:
Now using a punch to make holes to place my plants in. I like to make them in triangular patterns. Then just with a dab of super glue stick your plants onto the base.


Step Five: 
Keep adding plants around one edge of the base.


Step Six:
Once you have about a third of the perimeter suitably foliage. You may want to go in and put flock/turf among the plants to hide the base. 


Step Seven:
Another way you can hide the base is to use clump foliage to make the plants appear more dense than it really is. This is just up to personal taste. I like the way it looks.


Step Eight: 
Keep adding plants and clump foliage until you are happy with the look. This took me maybe two and a half hours, leaving time for the glue to dry.